MDS Customization
This section provides details on customizing MDS projects with MyST Studio.
There are two customizations that can be applied for customizing MDS projects against the target environment, these are:
- Applying MyST Late Binding
- Applying MyST Generic Configuration Plan
Oracle Metadata Store (MDS) provides a common metadata repository solution for a number of Oracle technologies, namely ADF, WebCenter and SOA applications. Metadata files created during design time in JDeveloper are referenced from MDS at run time by these applications.
Where MDS artifacts containing environment specific values are being manually deployed, these values must be modified at source before each deployment. This approach is not practical for continuous integration.
A common solution is to create sets of Ant/Maven scripts, and search and replace values of these files before deployment by looking up environment specific values defined in property files. This approach provides an improvement over the manual approach, but a number of issues remain, namely:
- There is a risk that non-centralized property files and values will be copied and pasted around, increasing the risk of configuration drift over time.
- This type of bespoke build and deploy scripting tends to grow more complex and less maintainable over time.
- There is a significant ongoing effort involved in bringing custom scripting to a robust level of usability.
The ideal MDS deployment solution should overcome all of the above issues, and MyST Late Binding from MyST Studio does exactly that.
Applying MyST Late Binding
MyST Late Binding involves tokenizing files with MyST data model property references which will be de-referenced and expanded to their corresponding data values during deployment (ie after build and initial packaging).
During deployment, MyST Late Binding expands the MDS jar/zip file, and performs a MyST property search and replace on *.ep.wsdl, *.wsdl and *.xml files with environment specific values obtained from the MyST engine; it re-packages the files back into the MDS archive file, and performs deployment to import metadata to MDS runtime server.
Steps
The following steps are required to achieve MDS customization using MyST Late Binding found in MyST Studio:
- Update all Platform Models with the latest environment specific values in MyST Studio.
Update MDS metadata source files with MyST property references. Only *.ep.wsdl, *.wsdl and *.xml file types will be searched and replaced.
Create an MDS build job in a CI server that integrates with MyST Studio via MyST Reverse Register Plugin.
- Note: The plugin will automatically register Artifacts in Myst Studio for your successful MDS builds - you don't need to create them manually.
Create further configurations for MDS deployment in MyST Studio, such as creating a Release Pipeline or a Release Definition.
Run MDS deployment via MyST Studio and the customization will be applied correctly.
Applying MyST Generic Configuration Plans
If you find that late binding is not sufficient for your particular use case, you can use a MyST Generic Configuration Plan. This solution can update any file in the MDS project. Fortunately, a generic configuration plan only requires minimal configuration effort.
Steps
This section summarizes the steps to apply a MyST Generic Configuration Plan to an MDS deployment in MyST Studio.
- Update all Platform Models with the latest environment specific values in MyST Studio.
In your file system, create a generic configuration plan file called myst-config-plan.xml. An example is given below. For detail see MyST Generic Configuration Plans
Put this file under the META-INF folder in the MDS project's root directory.
Create an MDS build job in a CI server that integrates with MyST Studio via MyST Reverse Register Plugin.
- Note: The plugin will automatically register Artifacts in Myst Studio for your successful MDS builds - you don't need to create them manually.
Create configurations for deployment in MyST Studio , such as creating a Release Pipeline or a Release Definition.
Run MDS Deployment via MyST Studio and the customization will be applied correctly.
SOA Customization
This section provides details on customizing SOA projects with MyST Studio.
There are two customizations that can be applied for customizing SOA projects against the target environment, these are:
- Applying MyST Late Binding on SOA Configuration Plan
- Applying MyST Generic Configuration Plan
In SOA applications, Oracle provides a customization solution known as a Configuration Plan. A Configuration Plan is an xml document generated from a SOA composite.xml using JDeveloper or the WLST scripting tool.
A configuration plan, when applied during deployment via JDeveloper or Oracle supplied Ant script, can modify the content of files within a SOA application, hence the SOA application is tailored for the target environment, such as Production.
SOA configuration plans support customization of the composite file (composite.xml), any wsdl imported from composite.xml (.wsdl), any xml schema file (.xsd) and JCA adapter files (.jca).
However, there are limitations to what can be changed by configuration plan, only certain properties and attributes can be modified. For detail please see: Deploying SOA Composite Applications - 11g Release 1 (11.1.1.6.3). For any environment value tokenization that cannot be achieved via SOA configuration plan, you can always apply MyST Generic Configuration Plan. This will be discussed shortly.
In a SOA project, typically developers generate one configuration plan from the composite.xml, then tailor the configuration plan for the target environment, or make various copies of the plan file. The maintenance of multiple configuration plans can be a nightmare. Firstly, the endpoint values are hard coded into the configuration plans. When an endpoint changes, developers must refactor that endpoint in all configuration plans across all affected SOA projects.
A better solution common in continuous integration is to write custom Ant/Maven scripts to automatically search and replace a single configuration plan per SOA project. This approach provides an improvement over the first approach, but a number of issues similar to those discussed for custom MDS deployment scripts remain.
The ideal SOA deployment solution:
- should maintain only a single configuration plan.
- does not require manual maintenance of property values across potentially numerous SCAs.
- should be a common and standardized solution across application tiers.
MyST Late Binding from MyST Studio fulfills the above requirements.
Applying MyST Late Binding on SOA Configuration Plan File
With MyST Studio, only a single configuration plan is required per SOA project regardless of the number of environments, and this is achieved by MyST property late binding. During deployment, MyST will expand the SOA jar/zip file, and perform a MyST property search and replace on *.ep.wsdl, *.wsdl and *.xml files with environment specific values obtained from the MyST engine; it then packages the files back into the SOA archive file and performs deployment.
Steps
This section summarizes the steps to apply an SOA configuration plan with MyST Studio.
- Update all Platform Models with the latest environment specific values in MyST Studio.
In each SOA project, generate a configuration plan from the SOA composite.xml file and named it "cfgplan.xml".
Modify the configuration plan to replace any environment specific detail with MyST property references.
Add any missing configuration in the configuration plan.
Create an SOA build job in a CI server that integrates with MyST Studio via MyST Reverse Register Plugin.
- Note: The plugin will automatically register Artifacts in Myst Studio for your successful SOA builds - you don't need to create them manually.
Create configurations for deployment in MyST Studio, such as creating a Release Pipeline or a Release Definition.
Run SOA Deployment via MyST Studio and the customization will be applied correctly.
Applying MyST Generic Configuration Plan
If the standard SOA configuration plan is not sufficient for your particular use case, you can apply a MyST Generic Configuration Plan. This solution can update any file in the SOA project. Fortunately, generic configuration plan only requires minimal configuration effort.
Steps
This section summarizes the steps to apply a MyST Generic Configuration Plan to an SOA deployment in MyST Studio.
- Update all Platform Models with the latest environment specific values in MyST Studio.
In your file system, create a generic configuration plan file called myst-config-plan.xml. An example is given below. For detail see MyST Generic Configuration Plans
Put this file under the META-INF folder in the SOA project's root directory.
Create an SOA build job in a CI server that integrates with MyST Studio via MyST Reverse Register Plugin.
- Note: The plugin will automatically register Artifacts in Myst Studio for your successful SOA builds - you don't need to create them manually.
Create configurations for deployment in MyST Studio, such as creating a Release Pipeline or a Release Definition.
Run SOA Deployment via MyST Studio and the customization will be applied correctly.
OSB Customization
This section provides details on customizing OSB projects with MyST Studio.
There are two customizations that can be applied for customizing OSB projects against the target environment, these are:
- Applying MyST Late Binding on OSB Customization File
- Applying MyST Generic Configuration Plan
Applying MyST Late Binding on OSB Customization File
Customization of common OSB values, including environment values, operational settings, and reference mappings, can be achieved by using an OSB customization file. In 11g this customization file is called ALSBCustomizationFile.xml; in 12c it is called OSBCustomizationFile.xml. For details please see the Oracle documentation: Customizing Oracle Service Bus Environments.
In many Oracle middleware projects, developers generate an OSB customization file from the OSB console on a given environment, eg TEST. They will then make a copy of the generated (TEST) configuration file for the other target environments and customize those copies accordingly (eg for UAT, PREPROD, PROD). In other words, there is a customization file to be maintained per environment/project combination.
This approach generally works fine, but it requires maintenance for each environment. For example, if there are five environments and 20 OSB projects, 100 customization files must be maintained in a project.
The solution to this problem is to maintain only 1 customization file per OSB project regardless of the number of environments .
Instead of keeping environment specific values in the environment specific customization files, MyST Studio maintains these values in the Platform Models. In the OSB customization file, the environment specific values must be replaced with MyST property references. The benefit of this tokenization is that only a single OSB customization file needs to be maintained.
During deployment, MyST Late Binding will expand the OSB jar file and perform a MyST property search and replace on OSB customization files with environment specific values obtained from the MyST engine; it packages the files back into the OSB archive file, and finally import OSB projects to OSB server.
The major advantage of this approach is that all team members only need to maintain environment specific values in a single location, ie in the Platform Model.
Steps
This section summarizes the steps to apply an OSB customization file with MyST Studio.
- Update all Platform Models with the latest environment specific values in MyST Studio.
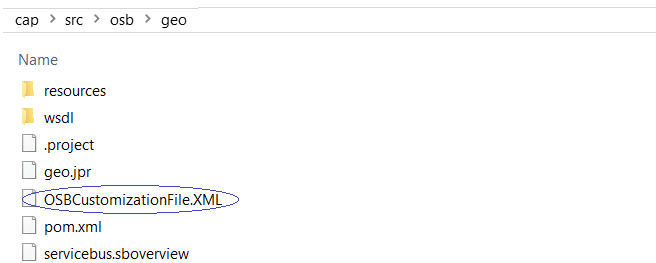
- In each OSB project, export the OSB customization file as OSBCustomizationFile.xml (for both 11g and 12c OSB projects) and put it under the root directory of the OSB project. The below diagram shows a 12c example.
- Modify the customization file to replace values with MyST property references.

Add any missing customization where required.
Create an OSB build job in a CI server that integrates with MyST Studio via MyST Reverse Register Plugin.
- Note: The plugin will automatically register Artifacts in Myst Studio for your successful OSB builds - you don't need to create them manually.
Create configurations for deployment in MyST Studio, such as creating a Release Pipeline or a Release Definition.
Run OSB Deployment via MyST Studio and the customization is applied correctly.
Applying MyST Generic Configuration Plan
If the standard OSB customization file is not sufficient for your specific use case, then you can apply a MyST Generic Configuration Plan. This solution can update any file in the OSB project. Fortunately, generic configuration plan only requires minimal configuration effort.
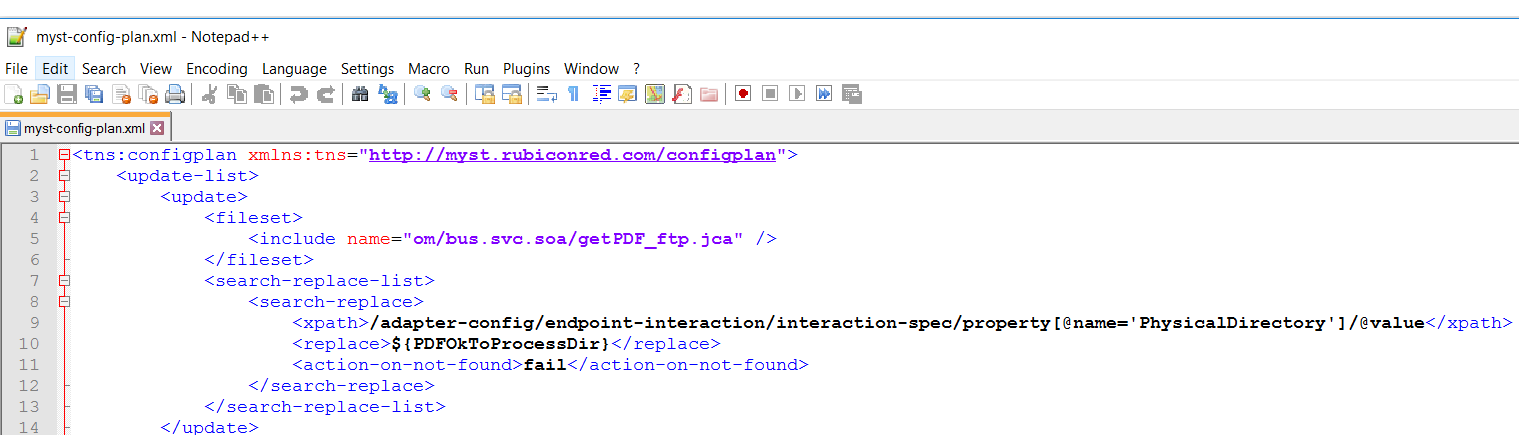
In some cases, an OSB customization file alone isn't enough to customize OSB projects to the target environment. For example, a proxy service may be configured with the File JCA transport, which contains environment specific JCA properties such as "PhysicalArchiveDirectory". These properties must also be replaced before OSB deployment.
In this case, MyST can use its own Generic Configuration Plan framework to capture environment properties and apply them to an artifact during deployment.
During OSB deployment in MyST Studio, MyST reads the generic configuration plan and compiles it down to a list of actions to replace any environment specific values before importing the OSB jar file into the target environment via the OSB import function provided by MyST Studio.
Steps
This section summarizes the steps to apply a MyST Generic Configuration Plan to an OSB deployment in MyST Studio.
- Update all Platform Models with the latest environment specific values in MyST Studio.
- In your file system, create a generic configuration plan file called myst-config-plan.xml. An example is given below. For detail see MyST Generic Configuration Plans
Put this file under the META-INF folder in the OSB project's root directory.
Create an OSB build job in a CI server that integrates with MyST Studio via MyST Reverse Register Plugin.
- Note: The plugin will automatically register Artifacts in Myst Studio for your successful OSB builds - you don't need to create them manually.
Create configurations for deployment in MyST Studio, such as creating a Release Pipeline or a Release Definition.
Run OSB Deployment via MyST Studio and the customization will be applied correctly.
BAM Customization
This section provides details on customizing BAM projects with MyST Studio.
There is one customization that can be applied for customizing BAM projects against the target environment, this is:
- Applying MyST Generic Configuration Plan
Oracle BAM allows users to create dashboards and monitor business services and processes. Typically, deploying BAM is a simple process of running the command line tool
to export artifacts from a source environment into a zip file format, and then import that zip file into a target environment.
The command line tools are different for 11g and 12c as follow:
- 11g: icommand (Location: <FMW_HOME>/Oracle_SOA1/bam/bin)
- 12c: bamcommand (Location: <FMW_HOME>/soa/bam/bin)
There is no out-of-the-box customization solution for BAM provided by Oracle.
In 12c, typically developers manually modify the bam zip file, or use bespoke scripting, to amend any files with environment specific values before running the bamcommand utility. However, this approach presents a challenge to automated continuous integration.
Fortunately, MyST Studio's Generic Configuration Plans provide a simple yet powerful solution to overcome this issue. With generic configuration plans, only a single copy of the bam zip file needs to be maintained and no manual modification is required.
Applying MyST Generic Configuration Plan
MyST uses the generic configuration plan framework that can capture environment properties and apply them to an artifact during deployment.
In BAM deployment, a generic configuration plan replaces values in files within bam zip file with environment specific values before importing the bam zip file into the target environment via the bamcommand utility by MyST Studio.
Steps
This section summarizes the steps to apply MyST Generic Configuration Plans on BAM deployment in MyST Studio.
- Update all Platform Models with the latest environment specific values in MyST Studio.
Perform the below prerequisite steps, then export a bam zip file from the bam console.
Setting up 12c bamcommand
Update the
/soa/bam/BAMCommandConfig.xml file to point to the correct BAM server host and port. Default is localhost. An example for exporting an EMS Object
bamcommand -cmd export -type ems -name JMS -file /tmp/BAMObjects12c.zipNote: The above command will export an EMS object called "JMS" as well as any associated DO object.
In the file system, create a generic configuration plan file called myst-config-plan.xml. An example is given below. For detail see MyST Generic Configuration Plans
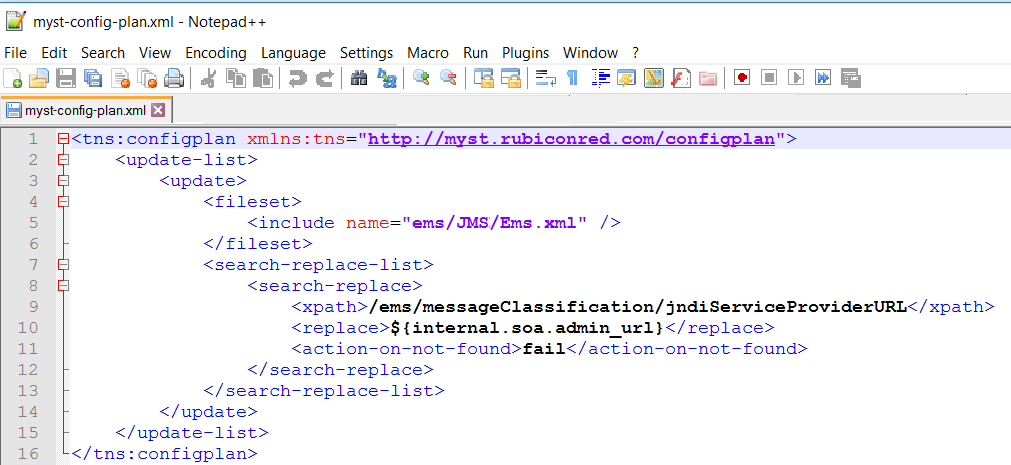
This generic configuration plan instructs MyST Studio to perform a search and replace on the ems/JMS/Ems.xml file inside the bam zip file, where the to-be-replaced element's location is expressed in the xpath, and the replace value containing the MyST property reference ${internal.soa.admin_url} will come from the MyST internal runtime engine.
- Add this file to the bam zip file root directory. An example is given below.

Create a BAM build job in a CI server that integrates with MyST Studio via MyST Reverse Register Plugin.
- Note: At the time of writing, the reverse register plugin will not automatically register a CI managed Artifact for BAM builds.
Manually create a Third Party managed Artifact in MyST Studio with the correct group-artifact-classifier-version (GAVC) values for your BAM built artifact.
Create further configurations for BAM deployment in MyST Studio, such as creating a Release Pipeline or a Release Definition.
Run BAM Deployment via MyST Studio and the customization will be applied correctly.