Supported Artifacts
- Property Exclusions
- Integration Cloud Archive
- Process Cloud Archive
- SCA
- OSB
- MDS
- ADF
- Java EAR
- Java WAR
- SQL
- B2B
- BAM
- MFT
- Application Configuration (Properties/XML)
- OSB Custom XPath
- OWSM Policy
- ODI Application (XML)
- JAR Library
- Java Shared Library
Property Exclusions
A list of artifact properties excluded from being published to MyST Studio. Avoid using the following properties:
core.*internal*
Integration Cloud Archive
Oracle Integration Cloud Archives can be deployed using MyST. These artifact types can be deployed to either Oracle Integration Cloud or the Legacy Integration Cloud Service. For each version of an Oracle Integration Cloud Archive which you wish to deploy, you must first register it with MyST. These steps can be performed manually, however, it is recommended to include these steps in a CI server job, so that they can be triggered automatically as required.
Step 1: Export your Integration Cloud Archive
We can export either from the Oracle Integration Cloud console, Integration Cloud Service console or via the REST API for either service.
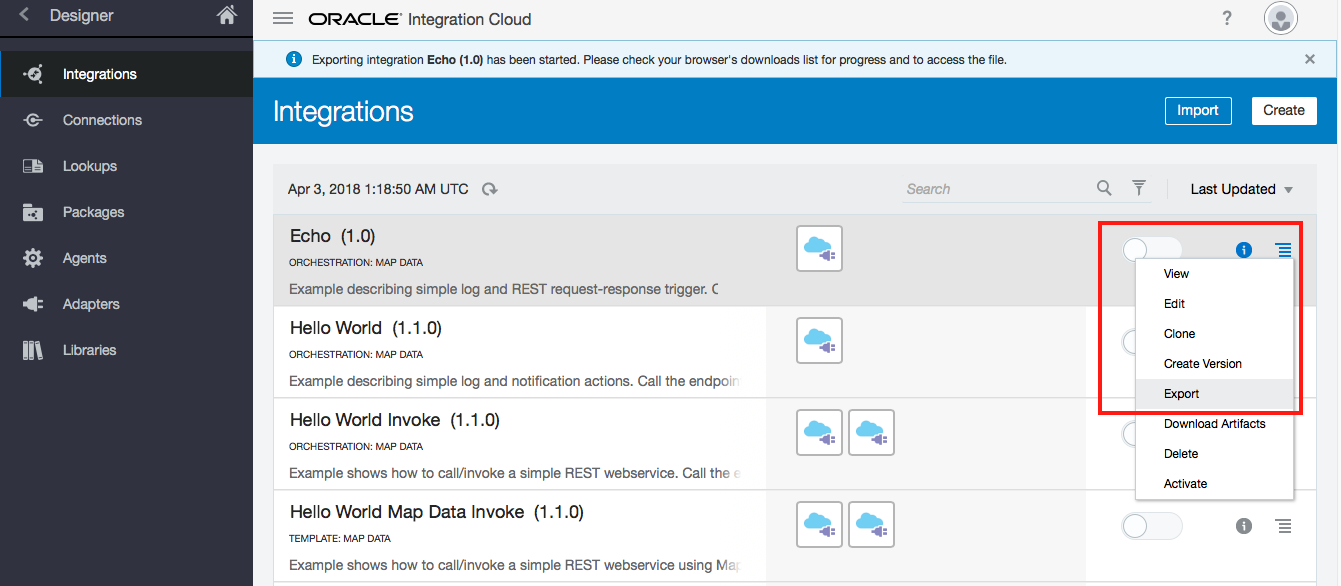
To export via the Oracle Integration Cloud console:
- Navigate to Integrations within the Oracle Integration Cloud console
- Download the Integration. This will download a file with the
.iarfile extension.
To export via the Oracle Integration Cloud REST API:
- Ensure you have
curlinstalled and are running on a Linux based machine - Set the following environmental variables to match your environment:
OIC_USERNAME="your-email@your-company.com" OIC_PASSWORD="your-password" OIC_HOST="your-instance.uscom-central-1.oraclecloud.com" OIC_ICS_PROJECT_ID="ECHO|01.00.0000" OIC_ICS_EXPORT_FILE_NAME="ECHO_01.00.0000.iar" - The
OIC_ICS_PROJECT_IDcan be obtained by combining the integration identifier with the version. These details can be found under the Primary Info menu item for the integration.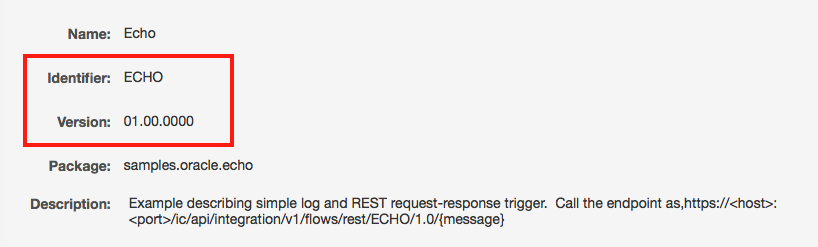
- Execute the following to export your project.
If using the Legacy Integration Cloud Service, then use the following insteadcurl -u ${OIC_USERNAME}:${OIC_PASSWORD} \ https://${OIC_HOST}/ic/api/integration/v1/integrations/${OIC_ICS_PROJECT_ID}/archive > ${OIC_ICS_EXPORT_FILE_NAME}curl -u ${OIC_USERNAME}:${OIC_PASSWORD} \ https://${OIC_HOST}/icsapi/v2/integrations/${OIC_ICS_PROJECT_ID}/archive > ${OIC_ICS_EXPORT_FILE_NAME}

Step 2: Create the Maven pom.xml
- Create a
pom.xml. Be sure to set the Maven details to match your environment. An examplepom.xmlis shown below.<?xml version="1.0" encoding="UTF-8"?> <project xmlns="http://maven.apache.org/POM/4.0.0" xmlns:xsi="http://www.w3.org/2001/XMLSchema-instance" xsi:schemaLocation="http://maven.apache.org/POM/4.0.0 http://maven.apache.org/xsd/maven-4.0.0.xsd"> <modelVersion>4.0.0</modelVersion> <groupId>com.rubiconred</groupId> <artifactId>RetrieveAllAirlines</artifactId> <packaging>jar</packaging> <version>1.0-SNAPSHOT</version> <name>Retrieve All Airlines</name> <properties> <myst.component.type>opaas-ics</myst.component.type> <ics.deployment-name>RetrieveAllAirlines</ics.deployment-name> <ics.configuration-plan>(EMBEDDED)/ics.json</ics.configuration-plan> </properties> <build> <resources> <resource> <directory>${project.basedir}</directory> <excludes> <exclude>pom.xml</exclude> </excludes> </resource> </resources> </build> </project>
MyST supports the following PCS-specific deploy-time properties being defined with the Maven pom.xml.
| Property | Description |
|---|---|
| ics.configuration-plan | Optional: Used for defining configuration for the integration connections. The file can be a path on the target host or a path in the packaged artifact (e.g. (EMBEDDED)/ics.json). |
| ics.deployment-name | Optional: Name of the deployed application. If not set, it will default to the Maven artifactId |
Step 3: Create a configuration plan (Optional)
If the integration has connections, then these will need to be defined in a JSON file that is packaged with the artifact itself. Below is an example configuration containing two REST API connections.
{
    "connections": {
        "FLIGHTAIRLINESREST": {
            "connectionProperties": [
                {
                    "propertyValue": "https://${flights.api.host}",
                    "propertyName": "connectionUrl"
                }
            ]
        },
        "LOGGERREST": {
           "connectionProperties": [
                {
                    "propertyValue": "https://${logger.api.host}",
                    "propertyName": "connectionUrl"
                }
           ]
        }
    }
}
Property references (e.g. flights.api.host and logger.api.host in the example above) will be automatically made available as artifact properties in MyST. These properties can be defined with different values per environment.
The connection identifiers (e.g. FLIGHTAIRLINESREST and LOGGERREST in the example above) must match the identifiers of the connections shown in the console. These identifier for a given connection can be found by clicking on Primary Info when viewing the connection.
Each connection type may have different available properties. The available properties for a given connection can be obtained by calling the connection through a GET API call on https://${OIC_HOST}/ic/api/integration/v1/connections/${OIC_CONNECTION_ID}.
Make sure the location of the JSON file is indicated against the ics.configuration-plan property in the pom.xml.
Step 4: Unpack the archive to the version control system (Optional)
Whilst it is possible to publish the artifact directly to Maven. It is recommended to rebuild the artifact from source. This will ensure that individual files changes are version controlled. This approach also allows for the configuration plan to be easily packaged alongside the artifact. An unpacked Integration Cloud Archive has a structure similar to the following
├── ics.json
├── icspackage
│   ├── appinstances
│   │   ├── FLIGHTAIRLINESREST.xml
│   │   └── LOGGERREST.xml
│   └── project
│       └── RETRIEVEALLAIRLINES_01.00.0000
│           ├── PROJECT-INF
│           │   └── project.xml
│           ├── ics_project_attributes.properties
│           └── resources
└── pom.xml
Step 5: Set a unique version number for our artifact
When publish an artifact to Maven and later registering it with MyST, it is important to ensure that the version number of the artifact is unique. This can be done via Maven prior to building the artifact. An example of this is described here.
Step 6: Build and publish your application to a Maven Repository
We can achieve the build and publish using Maven. For example:
mvn clean deploy
Alternatively, if we skipped step 3 and 4 and would rather publish our artifact directly to Maven, we may wish to do this directly using the deploy:deploy-file goal. For example:
mvn deploy:deploy-file -Durl=http://admin:password@your-myst-instance.com/artifactory/libs-release-local \
-Dfile=RetrieveAllAirlines.iar \
-DgroupId=com.rubiconred \
-DartifactId=RetrieveAllAirlines \
-Dversion=1.0-${BUILD_NUMBER} \
-Dpackaging=jar
Be sure to publish to the same Artifact Repository that is defined within the MyST Continuous Delivery Profile. This ensures that MyST will be able to retrieve the artifact at deploy-time.
Step 7: Register the artifact with MyST
This can be achieved through the MyST Java SDK or via the REST API. Alternatively, if you are using Jenkins, you can use the MyST Jenkins Plugin.
Once the Artifact is registered with MyST it can be added to a new or existing Application Blueprint and promoted across Oracle Integration Cloud or Integration Cloud Service instances using a Release Pipeline.
Process Cloud Archive
Oracle Process Cloud Archives can be deployed using MyST. These artifact types can be deployed to either Oracle Integration Cloud or the Legacy Process Cloud Service. For each version of an Oracle Process Cloud Archive which you wish to deploy, you must first register it with MyST. These steps can be performed manually, however, it is recommended to include these steps in a CI server job, so that they can be triggered automatically as required.
Step 1: Export your Process Cloud Archive
We can export either from the Oracle Integration Cloud console, Process Cloud Service console or via the REST API for either service.
To export via the Oracle Integration Cloud console:
- Navigate to Process Builder then Applications within the Oracle Integration Cloud console
- Download the Application. This will download a file with the
.expfile extension.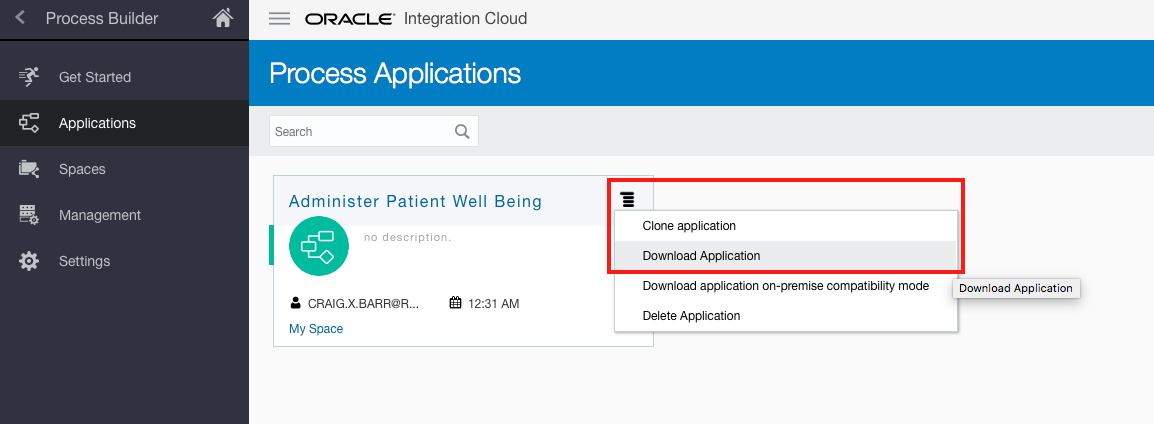

To export via the Oracle Integration Cloud REST API:
- Ensure you have
curlandjqinstalled and are running on a Linux based machine - Set the following environmental variables to match your environment:
OIC_USERNAME="your-email@your-company.com" OIC_PASSWORD="your-password" OIC_HOST="your-instance.uscom-central-1.oraclecloud.com" OIC_PCS_PROJECT_ID="Administer%20Patient%20Well%20Being" OIC_PCS_SPACE_NAME="RxR" OIC_PCS_EXPORT_FILE_NAME="AdministerPatientWellBeing.exp" - Ensure
OIC_PCS_SPACE_NAMEmatches the design-time space where your Process Application is located. In the example above, it is in theRxRspace. - Also, ensure that any space character in your project name is replaced with the
%20character. - Execute the following to export your project.
export OIC_PCS_SPACE_ID=$(curl -u ${OIC_USERNAME}:${OIC_PASSWORD} https://${OIC_HOST}/bpm/api/4.0/spaces/ | jq -r ".items[] | select( .name == \"${OIC_PCS_SPACE_NAME}\") | .id")
curl -u ${OIC_USERNAME}:${OIC_PASSWORD} https://${OIC_HOST}/ic/api/process/v1/spaces/${OIC_PCS_SPACE_ID}/projects/${OIC_PCS_PROJECT_ID}/exp > ${OIC_PCS_EXPORT_FILE_NAME}
To export via the Process Cloud Service console:
- Navigate to Develop Processes within the Process Cloud console
- Download the Application. This will download a file with the
.expfile extension.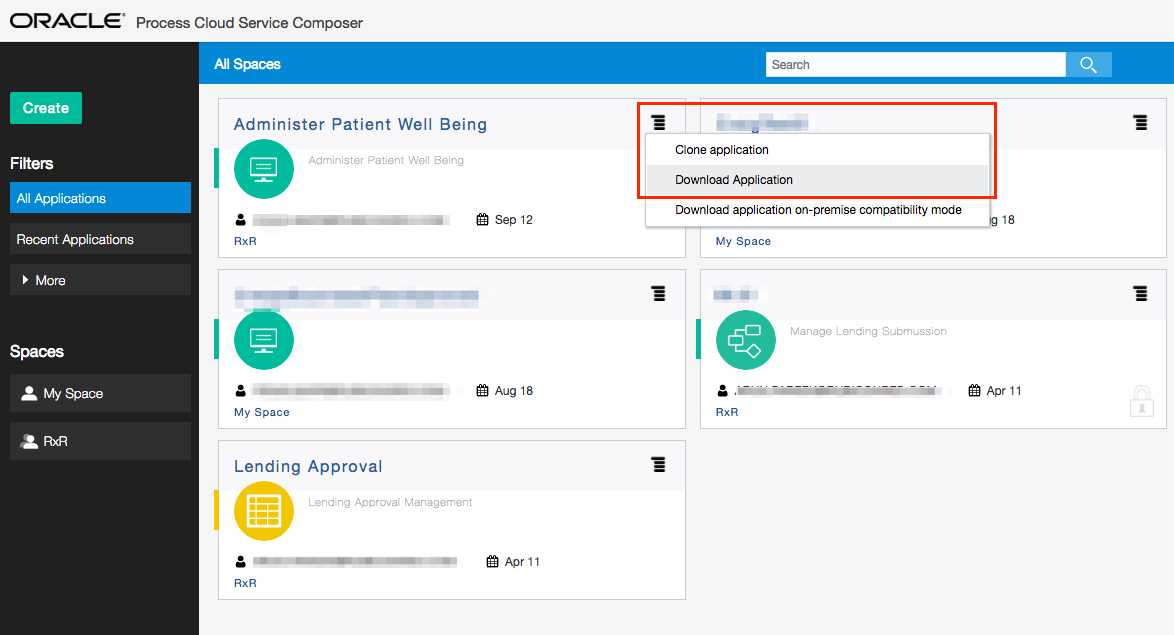
To export via the Process Cloud Service REST API:
- Ensure you have
curlandjqinstalled and are running on a Linux based machine - Set the following environmental variables to match your environment:
PCS_USERNAME="your-email@your-company.com" PCS_PASSWORD="your-password" PCS_HOST="your-instance.process.us2.oraclecloud.com" PCS_PROJECT_ID="Administer%20Patient%20Well%20Being" PCS_SPACE_NAME="RxR" PCS_EXPORT_FILE_NAME="AdministerPatientWellBeing.exp"- Ensure
PCS_SPACE_NAMEmatches the design-time space where your Process Application is located. In the example above, it is in theRxRspace. - Also, ensure that any space character in your project name is replaced with the
%20character.
- Ensure
- Execute the following to export your project.
export PCS_SPACE_ID=$(curl -u ${PCS_USERNAME}:${PCS_PASSWORD} https://${PCS_HOST}/bpm/api/4.0/spaces/ | jq -r ".items[] | select( .name == \"${PCS_SPACE_NAME}\") | .id")
curl -u ${PCS_USERNAME}:${PCS_PASSWORD} https://${PCS_HOST}/bpm/api/4.0/spaces/${PCS_SPACE_ID}/projects/${PCS_PROJECT_ID}/exp > ${PCS_EXPORT_FILE_NAME}
At the time of writing, Oracle do not support automated deployment of Decision Model Applications. Therefore, MyST is only able to support deployment of Process Applications at this time.
Step 2: Create the Maven pom.xml
- Create a
pom.xml. Be sure to set the Maven details to match your environment. An examplepom.xmlis shown below.<?xml version="1.0" encoding="UTF-8"?> <project xmlns="http://maven.apache.org/POM/4.0.0" xmlns:xsi="http://www.w3.org/2001/XMLSchema-instance" xsi:schemaLocation="http://maven.apache.org/POM/4.0.0 http://maven.apache.org/xsd/maven-4.0.0.xsd"> <modelVersion>4.0.0</modelVersion> <groupId>com.rubiconred</groupId> <artifactId>AdministerPatientWellBeing</artifactId> <packaging>jar</packaging> <version>1.0-SNAPSHOT</version> <name>Administer Patient Well Being</name> <properties> <myst.component.type>opaas-pcs</myst.component.type> <pcs.deployment-name>Administer Patient Well Being</pcs.deployment-name> <pcs.space-name>RxR</pcs.space-name> </properties> <build> <plugins> <plugin> <groupId>org.apache.maven.plugins</groupId> <artifactId>maven-shade-plugin</artifactId> <executions> <execution> <phase>package</phase> <goals> <goal>shade</goal> </goals> <configuration> <filters> <filter> <artifact>*:*</artifact> <excludes> <exclude>META-INF/</exclude> </excludes> </filter> </filters> </configuration> </execution> </executions> </plugin> </plugins> <resources> <resource> <directory>${project.basedir}</directory> <excludes> <exclude>pom.xml*</exclude> </excludes> </resource> </resources> </build> </project>
MyST supports the following PCS-specific deploy-time properties being defined with the Maven pom.xml.
| Property | Description |
|---|---|
| pcs.space-name | Design-time space for the given project. If the application already exists in the design-time space, it will be overwritten. |
| pcs.configuration-plan | Optional: A custom deployment configuration JSON payload in the format of the REST API call for deploying Process Applications. The file can be a path on the target host or a path in the packaged artifact (e.g. (EMBEDDED)/pcs.json). |
| pcs.deployment-name | Optional: Name of the deployed application. If not set, it will default to the Maven artifactId |
Step 3: Create a configuration plan (Optional)
By default, Process Applications are deployed with the following configuration plan
{
  "revisionId": "1.0",
  "overwrite": true,
  "forceDefault": true
}
To use an alternative configuration plan, create a file at the same directory as the pom.xml so that it will be included in the artifact when it is built. Make sure the location of this file is indicated against the pcs.configuration-plan property in the pom.xml.
Step 4: Unpack the archive to the version control system (Optional)
Whilst it is possible to publish the artifact directly to Maven. It is recommended to rebuild the artifact from source. This will ensure that individual files changes are version controlled. This approach also allows for the configuration plan to be easily packaged alongside the artifact. An unpacked archive has a structure similar to the following
├── Administer\ Patient\ Well\ Being
│   └── SOA
│       ├── HumanTasks
│       ├── Schemas
│       ├── WADLs
│       ├── WSDLs
│       ├── businessCatalog
│       ├── businessIndicators.bi
│       ├── composite.xml
│       ├── connectors
│       ├── contentMetadata.xml
│       ├── forms
│       ├── kpis.kpi
│       ├── measurementActions.xml
│       ├── measurements.xml
│       ├── organization.xml
│       ├── processes
│       ├── projectInfo.xml
│       ├── resources
│       ├── simulations
│       ├── socialMetadata.xml
│       ├── wsm-assembly.xml
│       └── xsl
├── pcs.json
└── pom.xml
Step 5: Set a unique version number for our artifact
When publish an artifact to Maven and later registering it with MyST, it is important to ensure that the version number of the artifact is unique. This can be done via Maven prior to building the artifact. An example of this is described here.
Step 6: Build and publish your application to a Maven Repository
We can achieve the build and publish using Maven. For example:
mvn clean deploy
Alternatively, if we skipped step 3 and 4 and would rather publish our artifact directly to Maven, we may wish to do this directly using the deploy:deploy-file goal. For example:
mvn deploy:deploy-file -Durl=http://admin:password@your-myst-instance.com/artifactory/libs-release-local \
  -Dfile=AdministerPatientWellBeing.exp \
  -DgroupId=com.rubiconred \
  -DartifactId=AdministerPatientWellBeing \
  -Dversion=1.0-${BUILD_NUMBER} \
  -Dpackaging=jar
Be sure to publish to the same Artifact Repository that is defined within the MyST Continuous Delivery Profile. This ensures that MyST will be able to retrieve the artifact at deploy-time.
Step 7: Register the artifact with MyST
This can be achieved through the MyST Java SDK or via the REST API. Alternatively, if you are using Jenkins, you can use the MyST Jenkins Plugin.
Once the Artifact is registered with MyST it can be added to a new or existing Application Blueprint and promoted across Oracle Integration Cloud or Process Cloud Service instances using a Release Pipeline.
SCA
| Property | Description |
|---|---|
| configuration-plan | Optional: SOA configuration plan to override endpoint, fault policy location etc. Can be a path on the target host ( [DOMAIN_HOME]/plans/cap.sca.configplan.xml) or a path in the packaged artifact ((EMBEDDED)/cap.sca.configplan.xml) |
| composite.name | SOA composite name for deployment or undeployment |
| composite.partition | SOA partition name to deploy composite into. Also used to undeploy composite |
| composite.redeploy | Boolean flag to control if existing composite can be overriden |
| composite.revision | Deployment version for SOA Composite |
| keepInstancesOnRedeploy | Boolean flag to allow existing running instances to continue on redeployment |
| soa.policies | Reserved for future capability to specify web service policy |
| soa.service-client | Reserved for future capability to specify web service policy |
| soa.service-endpoint | Reserved for future capability to specify web service policy |
| soa.subject | Reserved for future capability to specify web service policy |
| composite.redeploy | Whether or not to do an undeploy before a deployment. You do not need to set this for a typical 'redeploy'. It should be reserved for exceptional circumstances where a component can't be deployed until an undeploy usually due to poor code or a bug in the application. |
| myst-config-plan-apply | Boolean flag to specify whether to apply myst config plan |
| myst-config-plan-location | MyST configuration plan location to search and replace files with MyST properties. Can be a path on the target host ( [DOMAIN_HOME]/plans/myst.sca.configplan.xml) or a path in the packaged artifact ((EMBEDDED)/myst.sca.configplan.xml) |
| forceDefault | Optional: (true/false) Boolean flag to set whether the composite is default. Defaults to true. |
OSB
| Property | Description |
|---|---|
| osb.project-name | Optional value for listing the OSB project name(s). This will be used for deleting the artifact. Use comma-separated list (e.g. a,b,c) for multiple projects within one Artifact. |
| osb.customization-file | OSB customization file to replace endpoint and other properties |
| myst-config-plan-apply | Optional: Boolean flag to specify whether to apply myst config plan |
| myst-config-plan-location | Optional: MyST configuration plan location to search and replace files with MyST properties. Can be a path on the target host ([DOMAIN_HOME]/plans/myst.osb.configplan.xml) or a path in the packaged artifact ((EMBEDDED)/myst.osb.configplan.xml) |
| preserve-security-and-policy-values | Optional: (true/false) Preserve security and policy values. Defaults to true. |
| preserve-credentials | Optional: (true/false) Preserve credentials. Defaults to true. |
| preserve-access-control-policies | Optional: (true/false) Preserve access control policies. Defaults to true. |
| preserve-environment-variable-values | Optional: (true/false) Preserve environment variable values. Defaults to true. |
| preserve-operational-values | Optional: (true/false) Preserve operational values. Defaults to true. |
MDS
| Property | Description |
|---|---|
| mds.folder-names | List of folder names from artifact to deploy into MDS. Also used during redeployment. |
| mds.redeploy | Whether or not to do an undeploy before a deployment. You do not need to set this for a typical 'redeploy'. It should be reserved for exceptional circumstances where a component can't be deployed until an undeploy usually due to poor code or a bug in the application. |
| myst-config-plan-apply | Boolean flag to specify whether to apply myst config plan |
| myst-config-plan-location | MyST configuration plan location to search and replace files with MyST properties. Can be a path on the target host ( [DOMAIN_HOME]/plans/myst.mds.configplan.xml) or a path in the packaged artifact ((EMBEDDED)/myst.mds.configplan.xml) |
ADF
| Property | Description |
|---|---|
| j2ee.deployment-order | Weblogic startup order number that controls when the application starts up. Typically this value will be in the high 300s for application code For MyST CLI or Platform Blueprint > System Artifacts use property: deployment.order |
| j2ee.deployment-plan | Optional: Weblogic Application Deployment Plan to configure deployment descriptors and override property values. Can be a path on the target host ([DOMAIN_HOME]/plans/myst.adf.configplan.xml) For MyST CLI or Platform Blueprint > System Artifacts use property: deployment-plan |
| j2ee.redeploy | Boolean flag to control whether or not to do an undeploy before a deployment. You do not need to set this for a typical 'redeploy'. It should be reserved for exceptional circumstances where a component can't be deployed until an undeploy usually due to poor code or a bug in the application. For MyST CLI or Platform Blueprint > System Artifacts use property: redeploy |
| j2ee.stage-mode | Weblogic Stage mode for deployment. Valid values are STAGE, NOSTAGE, EXTERNAL_STAGE For MyST CLI or Platform Blueprint > System Artifacts use property: stage-mode |
| j2ee.target | List of targets to deploy application to. Can be managed server or cluster For MyST CLI or Platform Blueprint > System Artifacts use property: target |
| myst-config-plan-apply | Boolean flag to specify whether to apply myst config plan |
| myst-config-plan-location | MyST configuration plan location to search and replace files with MyST properties. Can be a path on the target host ([DOMAIN_HOME]/plans/myst.adf.configplan.xml) or a path in the packaged artifact ((EMBEDDED)/myst.adf.configplan.xml) |
| strip-version | Optional: Boolean flag to strip version from the artifact prior to deploy (e.g. Stock-1.0.0.ear becomes Stock.ear) |
Java EAR
| Property | Description |
|---|---|
| j2ee.deployment-order | Weblogic startup order number that controls when the application starts up. Typically this value will be in the high 300s for application code For MyST CLI or Platform Blueprint > System Artifacts use property: deployment.order |
| j2ee.deployment-plan | Optional: Weblogic Application Deployment Plan to configure deployment descriptors and override property values. Can be a path on the target host ([DOMAIN_HOME]/plans/myst.adf.configplan.xml) For MyST CLI or Platform Blueprint > System Artifacts use property: deployment-plan |
| j2ee.redeploy | Boolean flag to control whether or not to do an undeploy before a deployment. You do not need to set this for a typical 'redeploy'. It should be reserved for exceptional circumstances where a component can't be deployed until an undeploy usually due to poor code or a bug in the application. For MyST CLI or Platform Blueprint > System Artifacts use property: redeploy |
| j2ee.stage-mode | Weblogic Stage mode for deployment. Valid values are STAGE, NOSTAGE, EXTERNAL_STAGE For MyST CLI or Platform Blueprint > System Artifacts use property: stage-mode |
| j2ee.target | List of targets to deploy application to. Can be managed server or cluster For MyST CLI or Platform Blueprint > System Artifacts use property: target |
| myst-config-plan-apply | Boolean flag to specify whether to apply myst config plan |
| myst-config-plan-location | MyST configuration plan location to search and replace files with MyST properties. Can be a path on the target host ( [DOMAIN_HOME]/plans/myst.adf.configplan.xml) or a path in the packaged artifact ((EMBEDDED)/myst.j2ee.configplan.xml) |
| strip-version | Optional: Boolean flag to strip version from the artifact prior to deploy (e.g. Stock-1.0.0.ear becomes Stock.ear) |
Java WAR
| Property | Description |
|---|---|
| j2ee.deployment-order | Weblogic startup order number that controls when the application starts up. Typically this value will be in the high 300s for application code For MyST CLI or Platform Blueprint > System Artifacts use property: deployment.order |
| j2ee.deployment-plan | Optional: Weblogic Application Deployment Plan to configure deployment descriptors and override property values. Can be a path on the target host ([DOMAIN_HOME]/plans/myst.adf.configplan.xml) For MyST CLI or Platform Blueprint > System Artifacts use property: deployment-plan |
| j2ee.name | Application name |
| j2ee.redeploy | Boolean flag to control whether or not to do an undeploy before a deployment. You do not need to set this for a typical 'redeploy'. It should be reserved for exceptional circumstances where a component can't be deployed until an undeploy usually due to poor code or a bug in the application. For MyST CLI or Platform Blueprint > System Artifacts use property: redeploy |
| j2ee.stage-mode | Weblogic Stage mode for deployment. Valid values are STAGE, NOSTAGE, EXTERNAL_STAGE For MyST CLI or Platform Blueprint > System Artifacts use property: stage-mode |
| j2ee.target | List of targets to deploy application to. Can be managed server or cluster For MyST CLI or Platform Blueprint > System Artifacts use property: target |
| myst-config-plan-apply | Boolean flag to specify whether to apply myst config plan |
| myst-config-plan-location | MyST configuration plan location to search and replace files with MyST properties. Can be a path on the target host ( [DOMAIN_HOME]/plans/myst.adf.configplan.xml) or a path in the packaged artifact ((EMBEDDED)/myst.j2ee.configplan.xml) |
| strip-version | Optional: Boolean flag to strip version from the artifact prior to deploy (e.g. Stock-1.0.0.war becomes Stock.war. This means context root will be /Stock instead of /Stock-1.0.0) |
SQL
| Property | Description |
|---|---|
| sql.client | Command that can run sql files. e.g. sqlplus |
| sql.data-source-driver | Optional: Assumes Oracle JDBC Driver. Specify if non-Oracle |
| sql.data-source-password | JDBC password, can be a property like ${[rxr.def.Product-rcu].param[db-password]} |
| sql.data-source-sys-role | Optional: Boolean flag to determine if username specified has a sysdba privileges |
| sql.data-source-url | JDBC URL, can be a property like ${[rxr.def.Product-rcu].param[db-url]} |
| sql.data-source-username | JDBC username, can be a property like ${[rxr.def.Product-rcu].param[db-user-prefix]}_SOAINFRA |
| sql.delimiter | Optional: Specify delimiter in sql file to differentiate multiple commands in single file. e.g. ; |
| sql.execute | Path within archive for sql script e.g. (EMBEDDED)/01_db_change89778.sql |
| sql.fail-on-error | Optional: Boolean flag to allow script to continue on failure |
B2B
| Property | Description |
|---|---|
| myst-config-plan-apply | Boolean flag to specify whether to apply myst config plan |
| myst-config-plan-location | MyST configuration plan location to search and replace files with MyST properties. Can be a path on the target host ([DOMAIN_HOME]/plans/myst.b2b.configplan.xml) or a path in the packaged artifact ((EMBEDDED)/myst.b2b.configplan.xml) |
BAM
| Property | Description |
|---|---|
| myst-config-plan-apply | Boolean flag to specify whether to apply myst config plan |
| myst-config-plan-location | MyST configuration plan location to search and replace files with MyST properties. Can be a path on the target host ([DOMAIN_HOME]/plans/myst.bam.configplan.xml) or a path in the packaged artifact ((EMBEDDED)/myst.bam.configplan.xml) |
MFT
| Property | Description |
|---|---|
| myst-config-plan-apply | Boolean flag to specify whether to apply myst config plan |
| myst-config-plan-location | MyST configuration plan location to search and replace files with MyST properties. Can be a path on the target host ([DOMAIN_HOME]/plans/myst.mft.configplan.xml) or a path in the packaged artifact ((EMBEDDED)/myst.mft.configplan.xml) |
Application Configuration (Properties/XML)
| Property | Description |
|---|---|
| expand-properties | Optional: (true/false) defaults to true. Used with extract-files property. Takes files from the extract-files property with Maven/Ant-style references (eg. ${my.property} and substitutes them with name/value pairs from the MyST Platform Model properties. For MyST CLI or Platform Blueprint > System Artifacts use property: customize |
| extract-files | Comma separated list of files to extract from archive |
| target-directory | Target directory to place extracted files |
| target-is-domain-directory | Boolean flag to indicate path if path is relative to domain home directory |
OSB Custom XPath
| Property | Description |
|---|---|
| extract-files | Comma separated list of files to extract from archive |
OWSM Policy
| Property | Description |
|---|---|
| extract-files | Comma separated list of files to extract from archive |
ODI Application (XML)
| Property | Description |
|---|---|
| extract-files | Comma separated list of files to extract from archive and will be deployed via Smart Import |
JAR Library
| Property | Description |
|---|---|
| target-directory | Target directory to place extracted files |
| target-is-domain-directory | Boolean flag to indicate path if path is relative to domain home directory |
Java Shared Library
| Property | Description |
|---|---|
| j2ee.deployment-order | Weblogic startup order number that controls when the application starts up. Typically this value will be in the high 300s for application deployments |
| j2ee.redeploy | Boolean flag to control whether application can be redeployed with same version. |
| j2ee.stage-mode | Weblogic Stage mode for deployment. Valid values are STAGE, NOSTAGE, EXTERNAL_STAGE |
| j2ee.target | List of targets to deploy application to. Can be managed server or cluster |
| strip-version | Optional: Boolean flag to strip version from the artifact prior to deploy (e.g. Stock-1.0.0.jar becomes Stock.jar) |