Upgrading Platform Instances
In order to get the latest bug fixes and feature enhancements from your Oracle product investments, regular updates need to be applied. Fundamentally, there are two types of updates:
One-off patches: These are provided by Oracle and available for download from My Oracle Support to fix a specific defect or add a minor enhancement. One-off patches can be applied directly through Myst by first defining them within a Platform Blueprint then applying them to a Platform Instance.
Upgrades: An upgrade will introduce a significant number of bug fixes and major enhancements in one hit. Without Myst, an upgrade is usually resource intensive and risky. With Myst, an upgrade can be automated which significantly de-risks the upgrade process. This section primarily focuses on this type of upgrade. Upgrades can be either:
- Side-by-Side: also known as Out-of-place or Blue/Green
- or Direct: also known as In-place
Side-By-Side Upgrades
Most organizations, when migrating to Oracle SOA 12c or Oracle BPM 12c, choose to perform a side-by-side upgrade as it:
- requires zero downtime
- supports all SOA and BPM components
- allows for a phased migration
- involves significantly less risk
This involves provisioning a new instance of SOA/BPM 12c, replicating the configurations from your 11g platform and migrating and deploying your code. Once ready, you then switch over from 11g to 12c.
Most organizations fail to maintain accurate documentation of their current 11g configurations, so have to manually reverse-engineer their existing 11g production configurations so they can be re-applied to their new 12c environments. This is both time consuming and error prone approach.
Myst provides a simple and automated process for side-by-side upgrades. It allows administrators to introspect an existing 11g environment, extract the key configuration information and then use this to automatically provision an equivalent 12c environment in minutes.
Side-By-Side Upgrades made Simple
When performing a side-by-side upgrade, Myst will introspect the existing environment and create a corresponding 11g Platform Blueprint.
Next, specify the Oracle Middleware version required. Myst will automatically convert the Platform Blueprint to one that is compliant with the Oracle Enterprise Deployment Guide, whilst preserving any custom configuration.
Finally, specify the target environment(s) for the new upgraded domain. Then at the click of a button, Myst will automatically provision an equivalent upgraded Oracle Middleware platform.
The end-to-end process consists of three simple steps and can be performed in minutes as shown below.
Although this example is for an 11g to 12c upgrade, the approach would be consistent for alternative version upgrades such as an upgrade from 12.1.3.0.0 to 12.2.1.2.0 or from 12.2.1.0.0 to 12.2.1.3.0.
Step 1 - Introspect SOA / BPM 11gR1 Domain
For the purpose of this guide, we are going to introspect an existing Oracle SOA 11.1.1.7 environment running on two VMs, that consists of a 2 node SOA Cluster and 2 node OSB Cluster.
The steps for introspecting an existing Oracle SOA or BPM environment are documented in the chapter - Creating a Platform Blueprint from an Existing WebLogic Domain.
Introspection is only required if the environment to be upgraded was provisioned outside of Myst (e.g. by manual installation or another alternative method). If environment was built with Myst, the existing Platform Blueprint can be upgraded(as shown in the next step) rather than introspecting the environment first and creating one.
Step 2 - Upgrade 11g Platform Blueprint to 12c
The next step is to upgrade the 11g SOA Platform Blueprint to create a new SOA 12c Platform Blueprint. From the side menu navigate to Modeling > Platform Blueprints, this will display a list of existing Platform Blueprints. Click on Create New in the top right-hand corner of the screen. This will launch the New Platform Blueprint wizard.

In the initial dialog, we need to specify the following details about the Platform Blueprint:
- Name - Shorthand name for the Platform Blueprint.
- Description - A longer description of the Platform Blueprint.
- Workspaces - This defines the Workspaces to which the Platform Blueprint belongs (Role Based Access Control allows administrators to manage which workspaces a user has access to.)
- Initial Version - Specifies the initial version of the Platform Blueprint, we will stick with the default.
Finally, we need to specify how we want to create the Platform Blueprint, select the option to Upgrade from an existing blueprint and click Next.
Specify Oracle Middleware Upgrade Version
Next, we need to specify the Platform Blueprint that we want to upgrade, so from the drop down select the introspected Platform Blueprint; Oracle SOA 11.1.1.7 in our example.
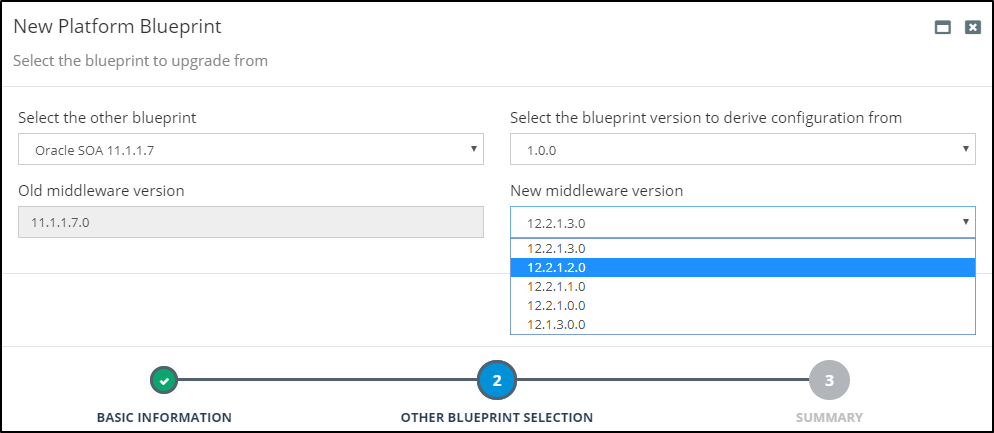
Next, we need to select the version of Oracle SOA 12c we want to upgrade to, in our example we will upgrade to 12.2.1.0.0. Once done, click Next.
Review the Summary
Myst will display a screen showing the summary of the old Platform Blueprint that will be upgraded and the new Platform Blueprint that it will create in the process.
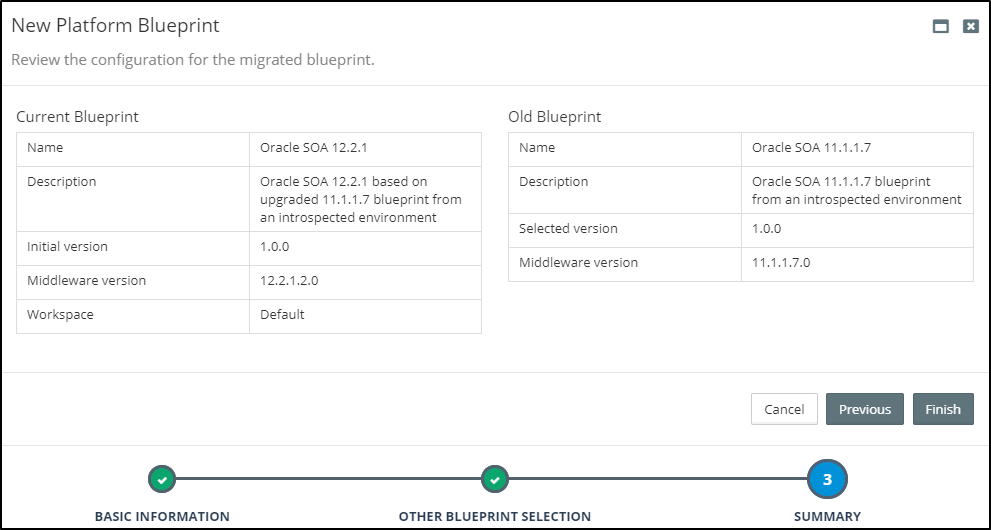
We can review these details. Once done, click Finish.
View/Edit Platform Blueprint
Myst will automatically convert our 11gR1 SOA Platform blueprint to an equivalent SOA 12c Platform Blueprint, whilst preserving the custom configurations that were previously applied to the 11g environment. This includes configurations such as JDBC Data Sources, File Stores, JMS Servers, JMS Modules, JCA Adapters and SAF Agents.
Once created, Myst will open the Platform Blueprint Editor where additional configuration changes can be made; for example, we may want to add in the Enterprise Scheduler Service that wasn't included in 11gR1.
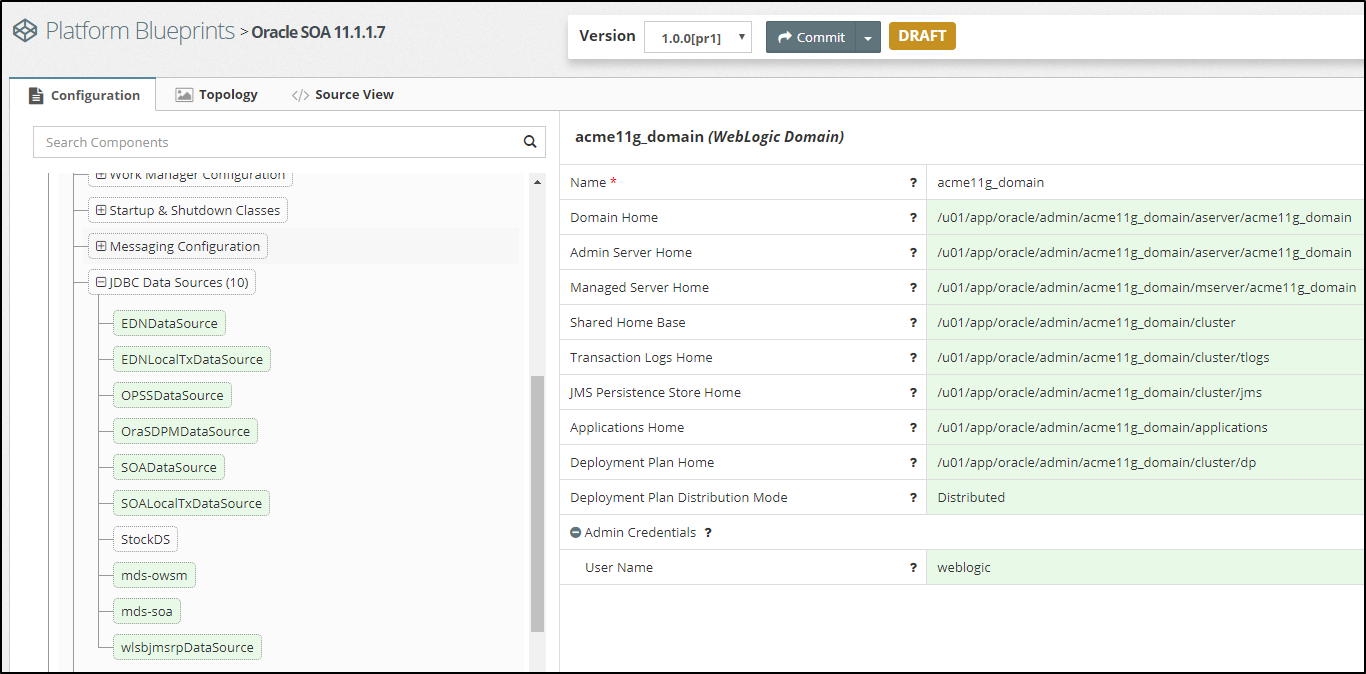
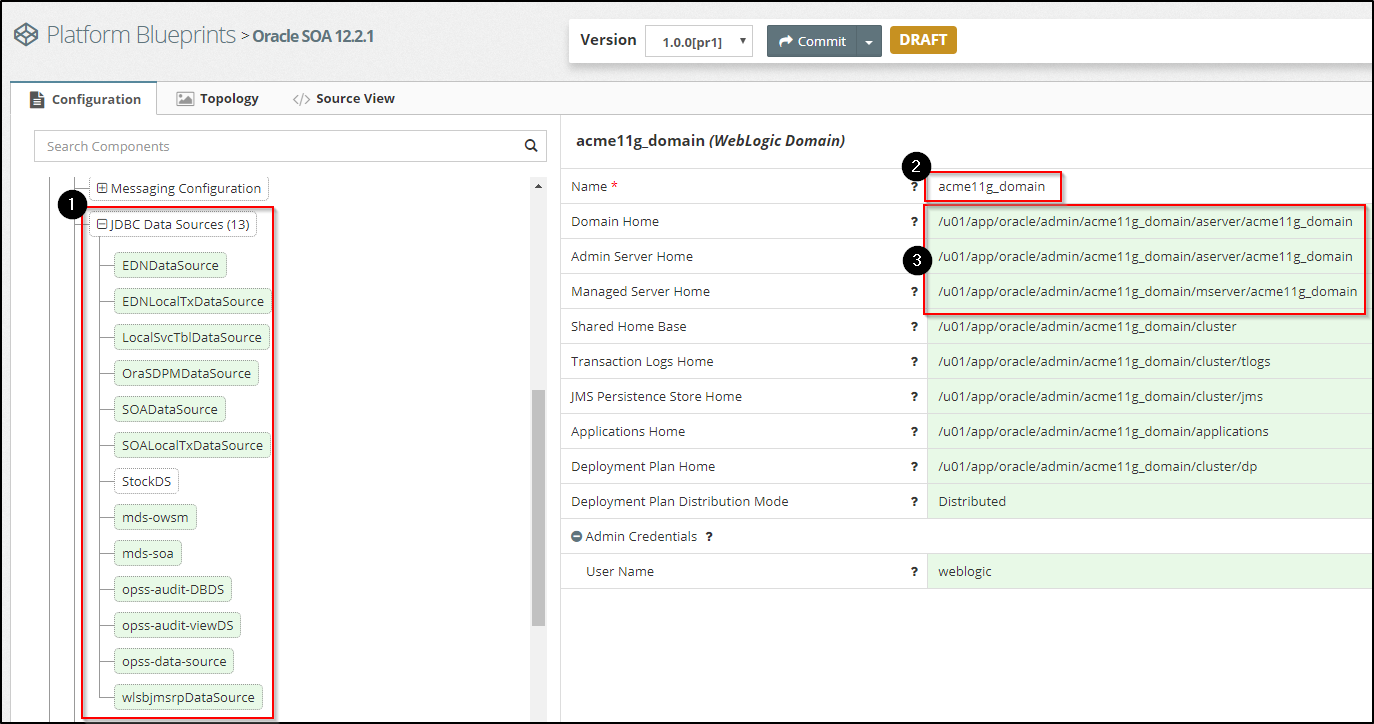
The first image above is that of the 11g Platform Blueprint while the second one below is that of the 12c one we created just now.
If we look closely at the 12c Platform Blueprint, we can see that the number of Data Sources is different. In the 11g Platform Blueprint, there were 10 JDBC Data Sources but in the 12c Platform Blueprint, there are 15 JDBC Data Sources (see box 1 outlined in red above). This is because in SOA 12c, changes were made to database schemas and corresponding JDBC Data Sources required by the Oracle SOA Platform.
When upgrading to 12c, Myst has the knowledge to remove the 11g data sources that are no longer needed and create the additional ones required for 12c. Myst has preserved the one custom data source, StockDS which is colored white (as opposed to product data sources in light green) in the screenshot above.
In addition, when the SOA 11gR1 domain was originally created, the middleware version number was specified as part of the Domain Name, for example acme11g_domain. The corresponding directory locations Domain Home, Domain Aserver Home, etc, also have this in their file path (see box 2 outlined in red above).

To change this, place the Platform Blueprint into Edit mode and update the WebLogic Domain name to acme12c_domain. Click on Calculate resolved values now.
We can see that Myst automatically shows the resolved values based on the new name.

With this minor edit, we are now ready to provision the new 12c environment. Typically when migrating to 12c, we will want to create multiple non-production environments, such as DEV, SIT, UAT and PRE-PROD to test and validate that the migrated code is performing as expected before promoting into Production.
With Myst, we can use the same Platform Blueprint to provision all these environments, ensuring each environment is consistent with Production. For each environment we want to provision, we need to create a Platform Model. This essentially maps the Platform Blueprint to the target infrastructure and captures environment specific configuration details, such as credentials.
Step 3 - Create Platform Model and Provision
Once we have finalized the migrated Platform Blueprint, the next step is to create a Platform Model and then use that to provision a Platform Instance. For more details on how to do this see Chapter 3.2 - Creating a Platform Model.
Direct Upgrades
A Direct Upgrade involves taking an existing platform including all of its configuration and migrating it directly. It does not have the many benefits of a Side-by-Side Upgrade and it will require a a longer outage.
When to do a Direct Upgrade
As a general rule, Side-by-Side Upgrades are the safest and simplest type of upgrade to execute. However, there are some circumstances where a Direct Upgrade may be the only option.
- Unavailablity of hardware resources to maintain parallel environments.
- When we have a lot of model-specific settings in Myst Studio and want to avoid re-creating the Platform Models
- When our application is architected in a way that we are unable to do a side-by-side upgrade.
When not to do a Direct Upgrade
We should avoid doing a Direct Upgrade
- When we want to be able to rollback immediately in the event of a failure.
- When we want to minimise downtime or avoid downtime altogether.
Types of Direct Upgrades
There are two types of Direct Upgrades:
- Fresh: This involves terminating the current instance and then re-provisioning it on the new version. It is the safest type of Direct Upgrade as it relies on a standard Oracle installation rather than the in-place upgrade tools from Oracle which are less reliable and do not work in all cases.
- State-preserving: This is the riskiest type of upgrade but it has the benefit of preserving the long running state of existing deployed applications. If you want to perform a State-preserving upgrade with Myst we would recommend raising a support ticket.
Direct Upgrades made Simple
Before performing a fresh direct upgrade, Myst will need to have existing Platform Blueprint and one or more Platform Models based off that.
If a Platform Blueprint and Models for your existing environments does not exist, we can introspect them using Myst.
When performing a fresh direct upgrade for a platform instance, terminate the instance, update the version number within the Platform Blueprint then re-provision the instance.
The end-to-end process consists of two simple steps and can be performed in minutes.
For the purpose of this guide, we are going to upgrade an existing Oracle Service Bus 12.1.3 environment to 12.2.1 using a fresh direct upgrade approach.
Although this example is for a 12.1.3 to 12.2.1 upgrade, the approach would be consistent for alternative version upgrades such as an upgrade of 11.1.1.7.0 to 12.1.3.0.0 or from 12.2.1.0.0 to 12.2.1.1.0.
Step 1 - Upgrade 12.1.3.0.0 Platform Blueprint to 12.2.1.0.0
Specify Oracle Middleware Upgrade Version
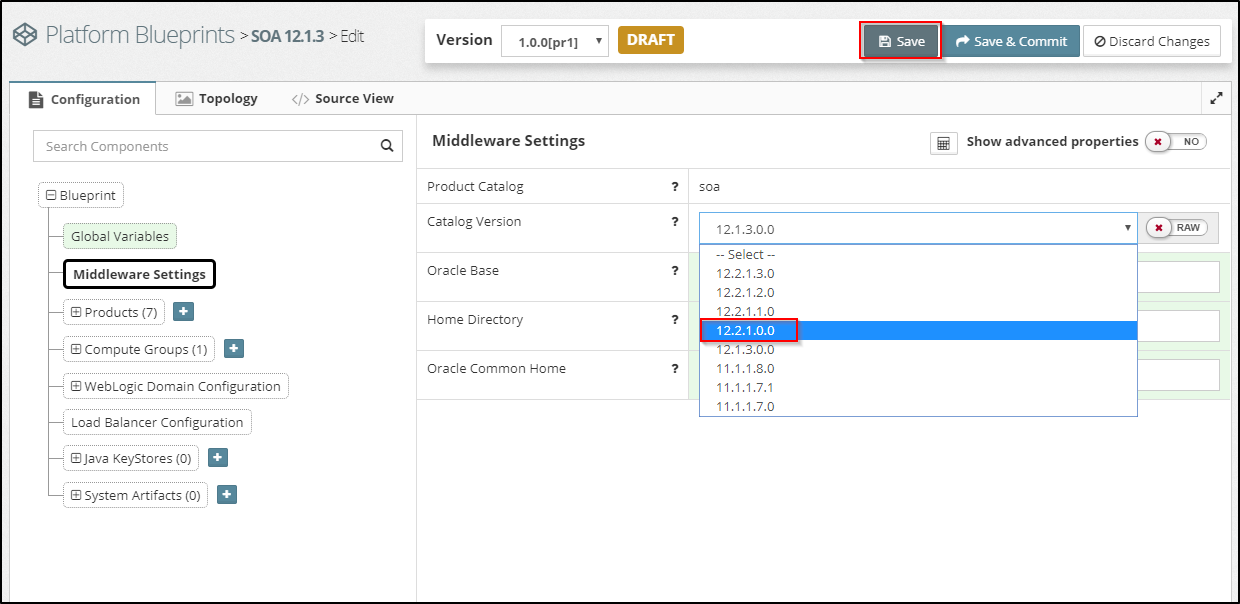
From the Blueprint Editor click Edit Configuration. Then, navigate to the Middleware Settings in the tree.
Choose the version, 12.2.1.0.0 from the drop-down, the click Save to save the Blueprint.
View/Edit Platform Blueprint
Myst will automatically convert the 12.1.3 Platform Blueprint to an equivalent 12.2.1 Platform Blueprint, whilst preserving the custom configuration that were previously applied to that environment. This includes configurations such as JDBC Data Sources, File Stores, JMS Servers, JMS Modules, JCA Adapters and SAF Agents.
If we look closely at our Platform Blueprint, we can see that there are some subtle differences. For example, if we are using the default Fusion Middleware Home Directory of /u01/app/oracle/product/fmw1213 we will see that it has changed to /u01/app/oracle/product/fmw1221.
If a custom Home Directory under Middleware Settings is being used, this must be changed so that it is unique before performing an upgrade. For example, if it is set to /opt/my-company/12.1.3.0.0/soa, it should be changed to /opt/my-company/12.2.1.0.0/soa.
Remember, a reference to the version ${[rxr.wls.Fmw-1].version} may be used e.g. /opt/my-company/${[rxr.wls.Fmw-1].version}/soa. If this property reference is already being used, then it would have changed the path automatically. Once the property reference is set within the Home Directory, it will update automatically for future upgrades.
Make sure that any other property references to the version in the configuration which are hardcoded are using a reference, whilst it may not cause the upgrade to fail it will be a source of confusion for the upgraded platform.
Once the upgraded Platform Blueprint has been reviewed, click on Save & Commit. When prompted, enter a description for the change.

With these minor edits, we are now ready to upgrade our environments. Typically when upgrading, we will want to create multiple non-production environments, such as DEV, SIT, UAT and PRE-PROD to test and validate that the migrated code is performing as expected before promoting into Production. With Myst, we can use the same Platform Blueprint to upgrade all these environments, ensuring each environment is consistent with Production.
Step 2 - Terminate and Re-provision the existing environment
From the Actions menu for any Platform Instance, there is the option to Terminate. This will destroy the WebLogic Domain on the file system to allow for it to be upgraded. This approach is described in more detail in the section on Managing Platform Instances.
Please be aware when this is performed, existing application state will be lost. Do not use this approach for an application architecture with long running processes. In this case, it is advisable to perform a State-preserving Upgrade which can be facilitated by raising a request to Myst Support.
When ready to do a fresh direct upgrade to an instance associated with the upgraded Platform Blueprint, simply trigger the Terminate then perform a Reprovision.